At Anonyome Labs we value well-written code that has good tests. This is a guide on how we go about producing useful and meaningful tests for our Android code.
Testing approach: SDK or app?
Testing code isn’t a “one approach fits all” affair. The nature of the code you want to test will dictate the strategy you should employ. For example:
- Building an SDK?
Unit tests that use a mock environment will give good coverage of hard-to-reach error paths, plus integration tests that run on Android device or emulator will exercise real world behaviour. - Creating an app?
Unit tests that use a mock environment plus Espresso visual tests that exercise all the visual elements and the screen-to-screen navigation will give you confidence all is well.
Your desire to test your code well will often mean you will structure your code in a way that makes it easier to test. It might make it a little more complicated than you had originally intended, by causing you to make parts of it replaceable when under test, but don’t be shy of this. Good tests will give you confidence in your code and give the next person who has to maintain it confidence they have not broken anything.
Unit tests that use a mock environment
Writing tests that run your code under the control of JUnit or Robolectric with a mocking library, such as Mockito, will allow you to replace the code you didn’t write with mock or spy versions. When the tests run your code, they can check it made all the right calls. You can use these mocks to cause exceptions to be thrown from all the different places where an error can occur and check your code handles them correctly. In many cases, trying to test the error paths without using mocks and spies can be very difficult.
Imagine you have created a nice new API and you want to test it. Here is a very simple example:
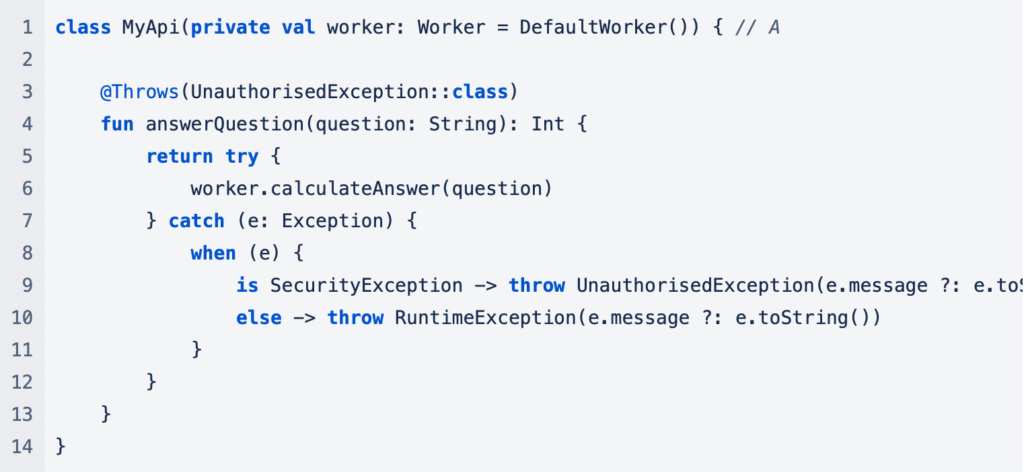
At point A in MyApi you can see that the Worker, which simulates some other system your API needs to use, is provided to the API in the constructor which will allow you to override it in tests.
Here is a test you might write to exercise the API and check the API does what you intend under normal operation and that the error conditions are handled correctly under abnormal conditions:
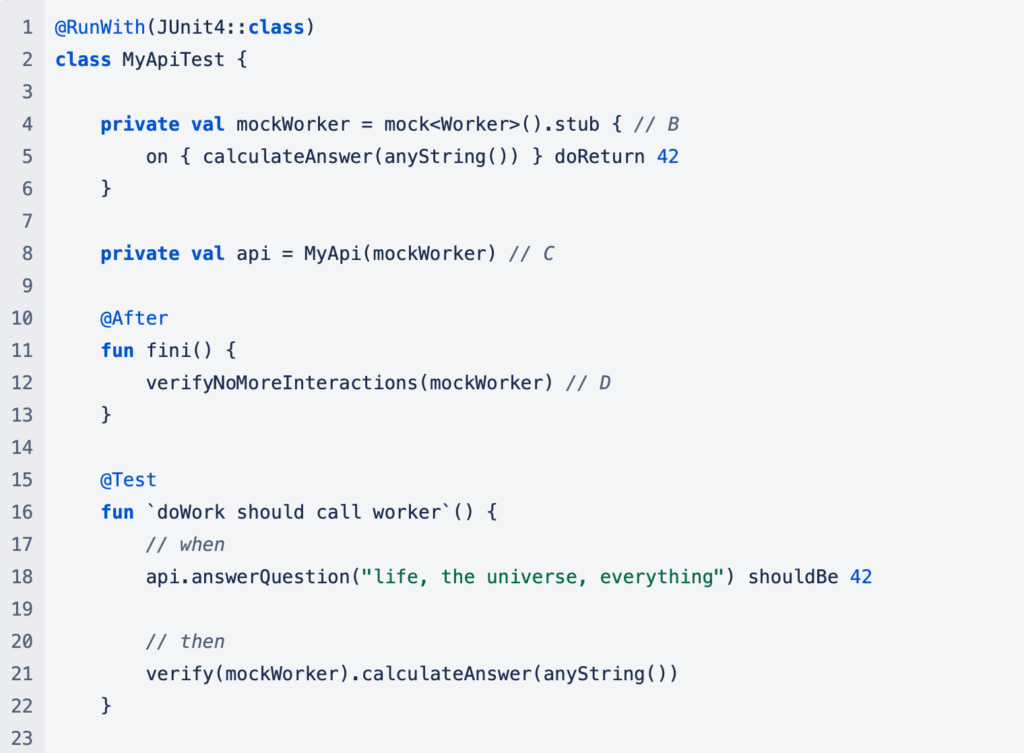
At B in MyApiTest, a mockWorker is created that replaces the real Worker at C. This allows you to control the behaviour of the Worker and get it to misbehave when you need it to in the tests that check handling of error conditions.
At D in MyApiTest, the fini method is annotated so that it is run after (@After) each test (@Test). It checks that the test that has just been run has correctly verified that every interaction by your API with the mock has been accounted for with a verify call. This will trap any unexpected interactions by your API with the Worker.
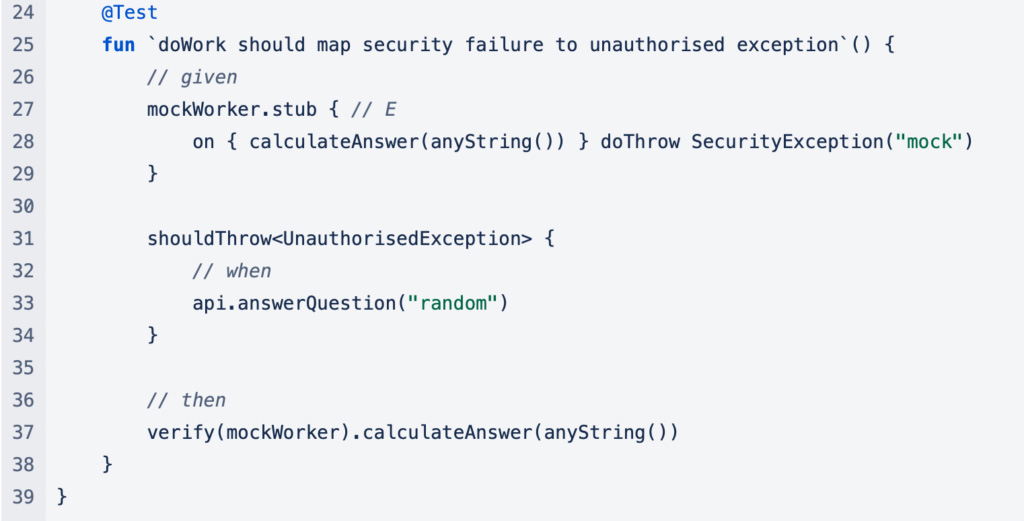
At E in MyApiTest, the mockWorker is changed for just that test to throw an exception instead of returning a result. This allows you to check that all the error conditions that can occur are dealt with by your API.
Other interesting aspects to note about this test are:
- The test methods have unusual names. They provide a description of what the test is doing and the expected outcome. They often have the form
`<method name> should <do|not do> <something>`. - There are many powerful testing libraries that can make your test easier to read and maintain. The
shouldThrowmethod is used to check that thedoWorkmethod throws an exception and that it is the the correct exception. - The comments
given,whenandthenare encouraged because they make the tests easier to read and make it clear which part of the code is setup, invocation and checking for expected results.
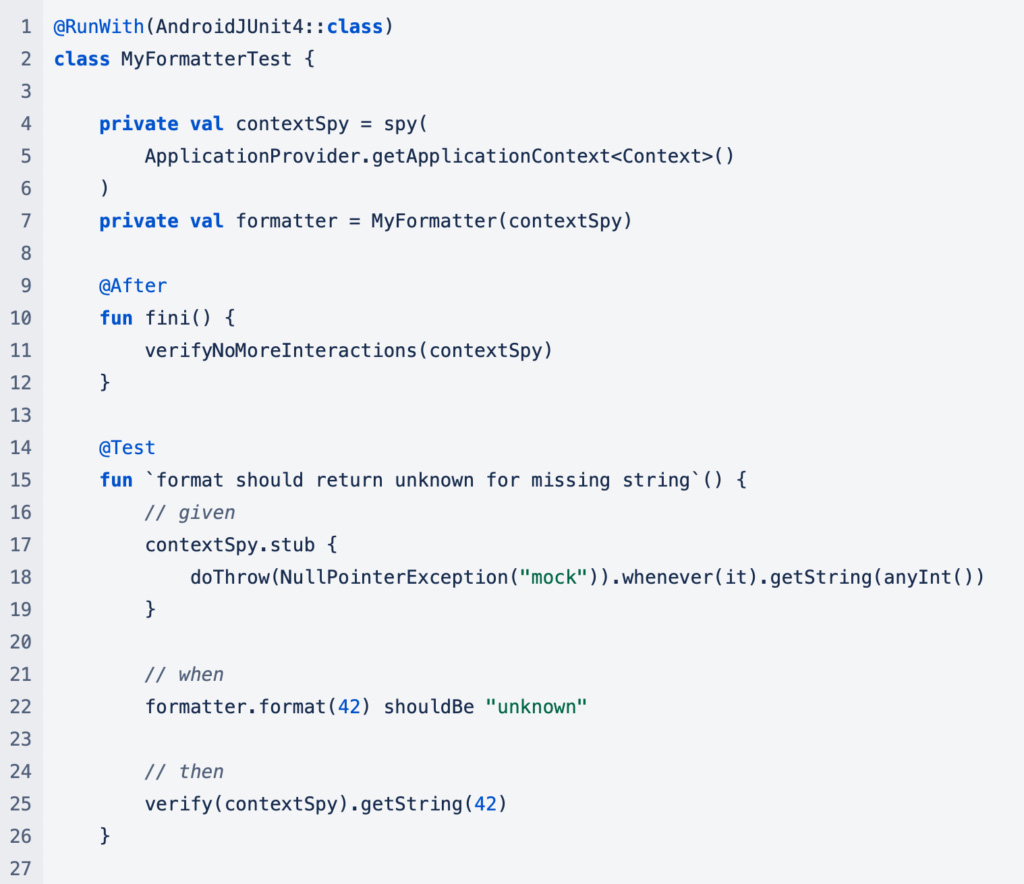
Spy versus mock
There are situations where using a spy instead of a mock object may be beneficial. A mock is appropriate when you want to replace all the methods of an object. A spy can be used to replace a small number of methods on a real object. This is particularly useful on objects with many methods.
Imagine you have an API that uses android.content.Context which is a very common class with many methods.
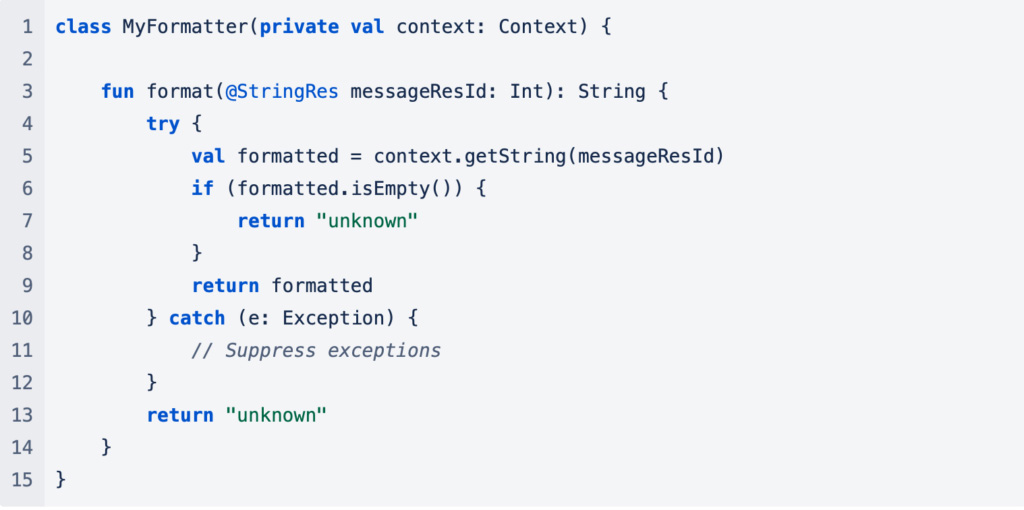
And of course you want to test it well but mocking out the Context class would be tiresome — after all, your API only uses one method. This is where a spy is useful.
Testing on an Android device or emulator
Testing with mocks under the control of JUnit or Robolectric is a great way to really exercise your code, but it’s not the real world. Writing a test that runs on Android and makes use of the real environment will give you an extra level of confidence that you are using the right APIs on the platform and that you are using the environment correctly and have all the necessary permissions. This is very valuable when you are dealing with connections over a network, local databases or any other type of specialised API.
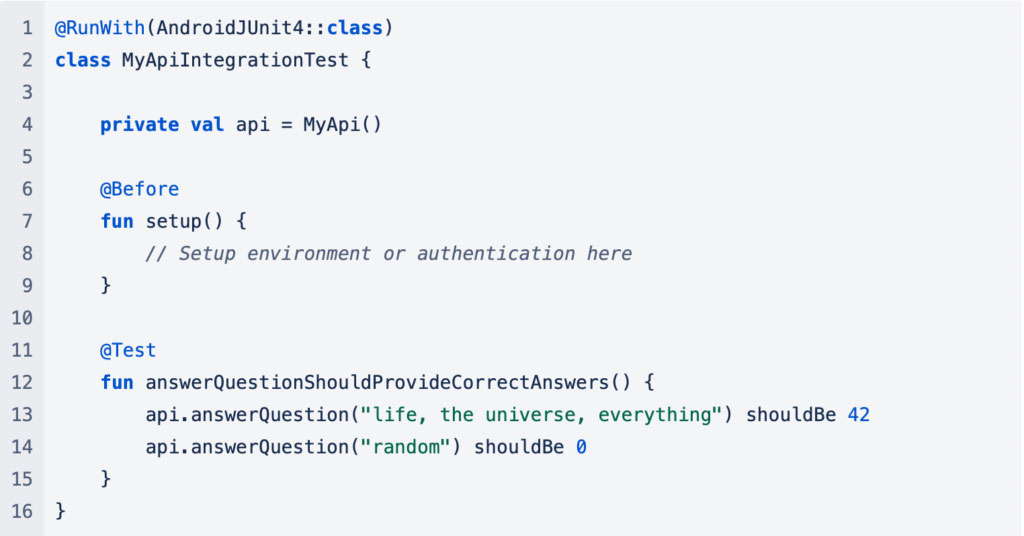
This test focuses on checking that the API operates correctly under normal conditions when run on an Android device or emulator. Interesting aspects of this test are:
- The method names have to be proper Java identifiers to be run on Android.
- A different runtime environment is required for on device tests (
@RunWith(AndroidJUnit4::class)). - No mocks are being used.
It is possible that setting up an integration test that can authenticate with your servers to run the tests may be difficult. This will depend on the nature of your API and authentication mechanisms. Don’t immediately throw this in the ‘too hard basket.’ At Anonyome we design our systems so that we always have a test authentication mechanism that can be used instead of the production authentication system by developers during development and by automated tests. Naturally this must be done very carefully to avoid introducing a security hole, but if you can achieve this you will have a well-tested system in which you will have confidence.
Testing an app screen
When building an app, it is good practice to structure your code so that each screen can be tested thoroughly in isolation. Generally at Anonyome we use the VIPER design pattern for each of our screens. This pattern leads us to naturally break up the parts of each screen into pieces that can be easily separated. Each piece is supplied with the APIs it needs, usually at construction, making it easy to mock these pieces and then use the verify and verifyNoMoreInteractions methods to check we have accounted for all the places our screen interacts with other parts of the app.
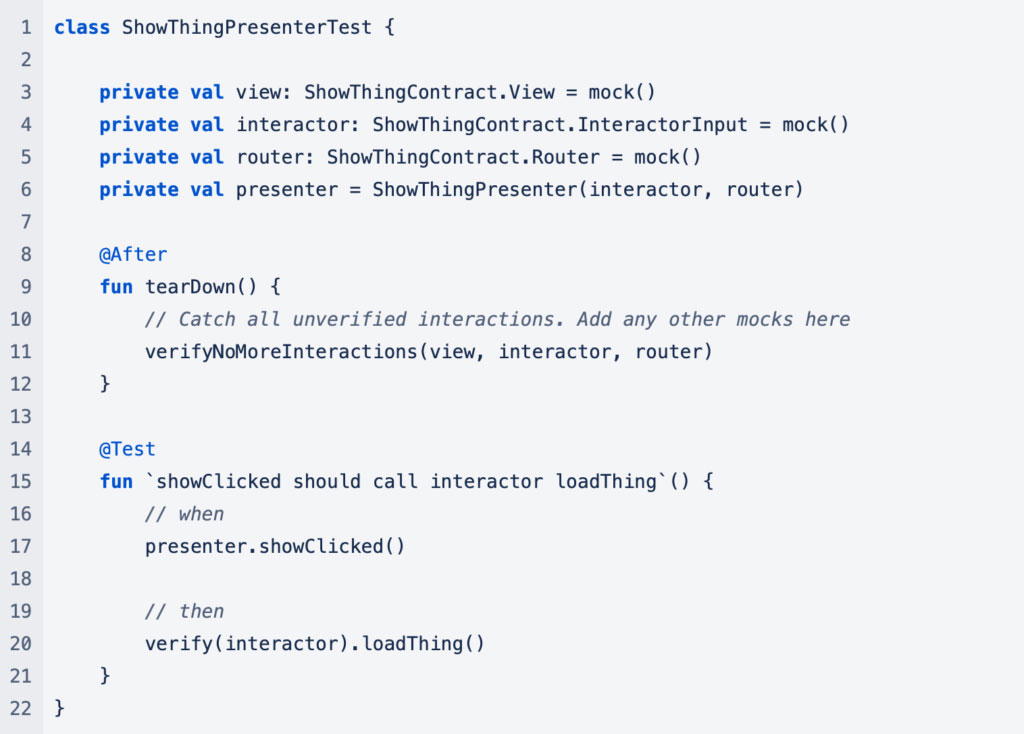
Here is a simplified example of a screen implemented as a VIPER module:
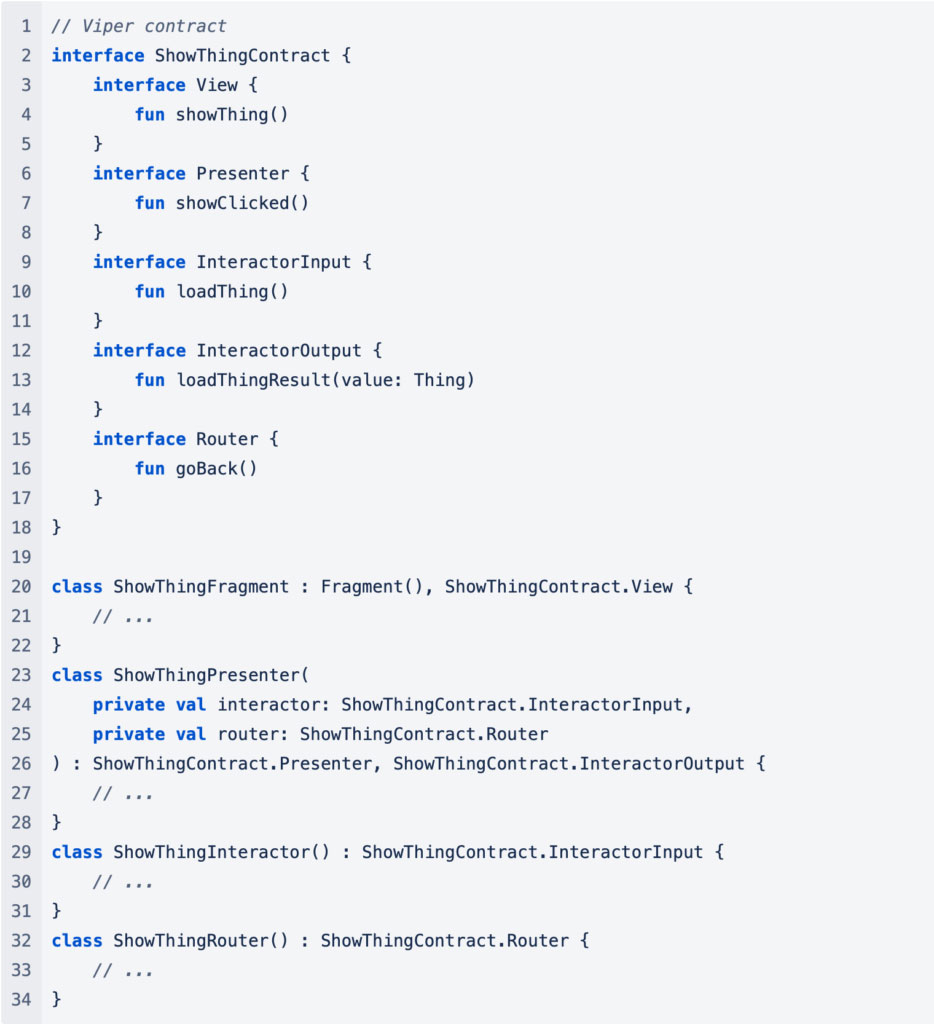
Because the classes of the screen communicate to each other through interfaces, it is easy to test each part of the screen in isolation. Here is an example of how the presenter test might look:
Visual testing with Espresso
While it’s good practice to test all your screens in isolation with unit tests and mocks, this can’t give you confidence that your app actually hangs together. Unit tests can’t check that the flow of screens in your app is correct and that the right screen is shown in the right order. This is where visual testing with Espresso comes in.
Espresso tests invoke an Activity within your app and then simulate clicking on views, entering text, scrolling and all the other actions a real user would perform.
There are many articles on how to write Espresso tests available on the Android Developers site and elsewhere, so I won’t repeat that material here.
When you start developing an Espresso test for the first time using the Espresso APIs you very quickly end up with a test with hundreds of lines of calls of the Espresso methods. This usually results in a long test that can be very difficult to understand for developers who have to maintain the code after you.
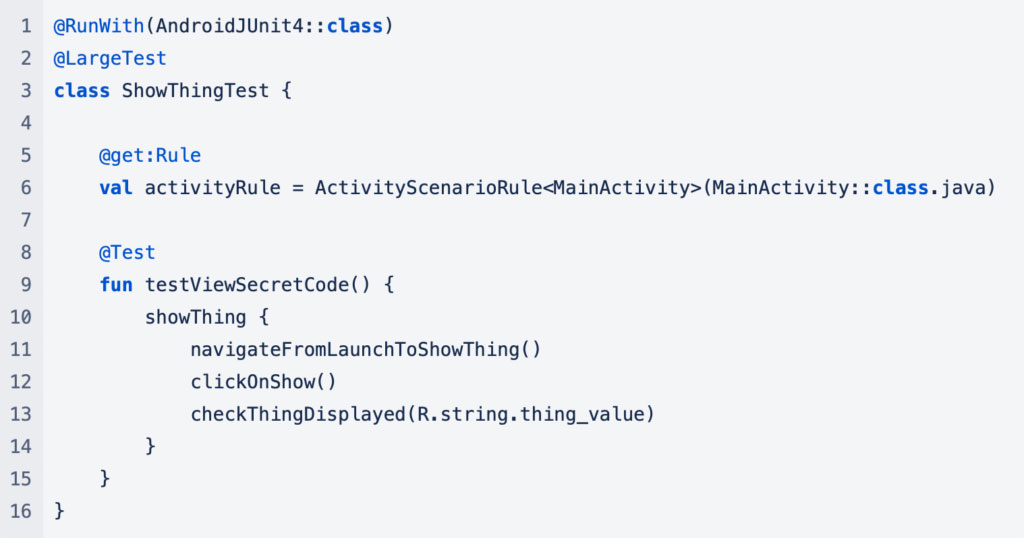
To combat this there is a pattern for developing Espresso tests that we have adopted at Anonyome. We use a robot pattern for our tests. Each screen of your app has an associated robot that knows about the controls of that screen and sometimes how to navigate to it from when the app is launched.
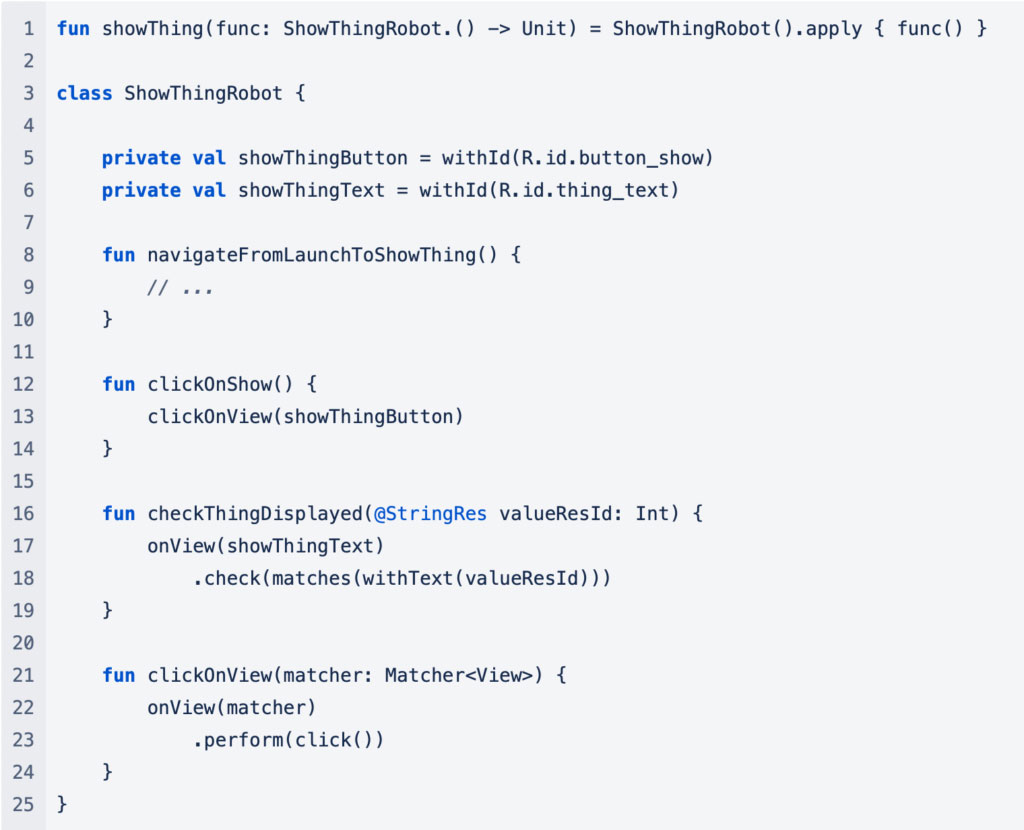
Using the robot the test becomes much simpler and easier to maintain:
Recipes
@VisibleForTesting
There may be parts of your app that you need to expose to test code so that it can check for correct operation. This can be done by making those parts more widely visible and annotating them with @VisibleForTestingwhich tells the IDE that only tests can exploit the wider visibility of this item.
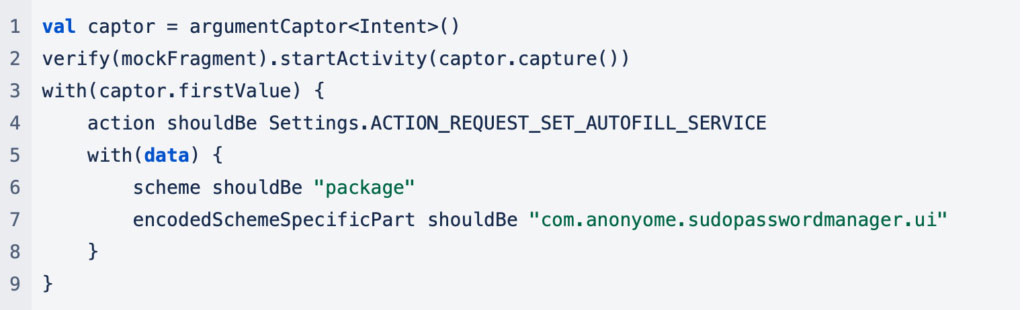
Capturing arguments from calls to mocks
When using a mock there may be times that at the end of the test you want to check that not only was the method of the mock called but it was called with the correct arguments.
When you only want to check a few of the arguments of the call there is the argThat matcher that can help. In this example we want to verify that our code invoked an Activity with the correct action.

If you have more complicated checks that you wish to perform on the method arguments, you can capture the value(s) with an argumentCaptor and perform all sorts of checks. In this example we want to verify that our code invoked an Activity with the correct information inside the Intent.
Conclusion
If you are building an app, use a combination of unit tests and Espresso tests to give you excellent coverage and confidence your app is working properly. If it’s an SDK, then the combination of unit tests and integration tests will do the same.
To take advantage of the full power of mocks and spies in unit tests, you may have to structure your code so that is exposes the interfaces your code uses to communicate with other parts of the app or operating system. This will allow you to thoroughly check all the paths through your code.
Use the robot pattern to make your Espresso tests concise, readable and maintainable.